

An AxKit Image Gallery
AxKit is not limited to working with pure XML data. Starting with this article, we’ll work with and around non-XML data by developing an image browser that works with two types of non-XML data: a directory listing built from operating system calls (file names and statistics) and image files. Furthermore, it will be built from small modules that you can adapt to your needs or use elsewhere, like the thumbnail generator or the HTML table wrapper.
By the time we’re done, several articles from now, we’d like an application that:
- provides navigation around a tree of directories containing images,
- displays image galleries with thumbnails,
- ignores nonimage files,
- allows you to define and present a custom set of information (“meta data”) about each image,
- allows you to view the complete images with and without metadata,
- uses a non-AxKit mod_perl handler to generate thumbnail images on the fly, and
- allows you to edit the metadata information in-browser
That feature list should allow us to build a “real world” application (rather than the weather examples we’ve discussed so far), and hopefully a useful one as well. Here’s a screenshot of the page created by this article and the next:
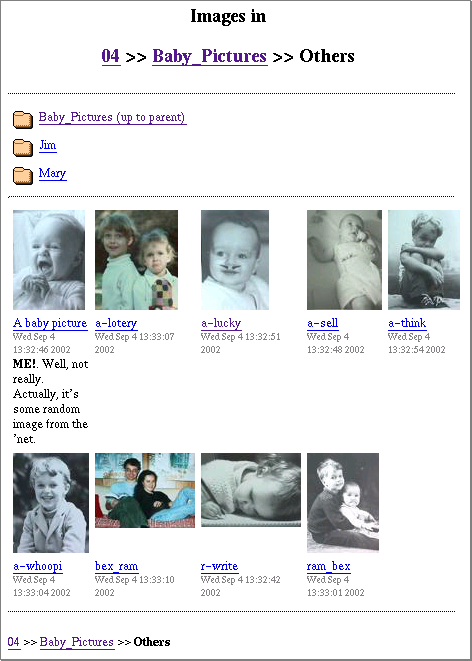
That page has four sections:
- Heading: Tells you where you are and offers navigation up the directory tree.
- Folders: links to the parent directory and any sub folders (Jim and Mary).
- Images: offers a thumbnail and caption area for each image. Clicking on an image or image title takes you to the full-size variant.
- Footer: A breadcrumbs display for getting back up the directory tree after scrolling down through a large page of images.
We’ll implement the (most challenging) third section in this article and the other section in the next article.
If you want to review the basics of AxKit and Apache configuration, then here are the previous articles in this series:
Working with non-XML data as XML
The easiest way to actually work with non-XML data in AxKit is to turn it in to XML often and feed it to AxKit. AxKit itself takes this approach in its new directory handling feature – thanks to Matt Sergeant and Jörg Walters AxKit can now scan the directory and build an XML document with all of the data. This is a lot like what native Apache does when it serves up an HTML directory listing, but it allows you to filter it. The main part of this article is about filtering this directory listing in order to create a gallery, or proofsheet, of thumbnail images.
In This Series Introducing AxKit XSP, Taglibs and Pipelines Taglib TMTOWTDI |
In this case, we’ll be using a relatively recent addition to AxKit’s standard toolkit, SAX Machines, integrated in to AxKit thanks to Kip Hampton. (disclaimer: XML::SAX::Machines is a module I wrote.) The SAX machine we’ll create will be a straight pipeline with a few filters, a lot like the pipelines that AxKit uses. This pipeline will dissect directory listings and generate a list of images segmented into rows for easy display purposes. We don’t get in to the details of SAX or SAX machines except to bolt together three building blocks; all of the gory details are handled for us by other modules. If you are interested in the gory details, then see Part One and Part Two of Kip’s article “Introducing XML::SAX::Machines” on XML.com.
After the SAX machine builds our list of images, XSLT will be used to merge in metadata (like image titles and comments) from independant XML files and format the result for the browser. The resulting pages look like:
Managing non-XML data (the images)
On the other hand, it doesn’t make sense to XMLify raw image data (though things like SVG–covered in XML.com’s Sacre SVG articles–and dia files are a natural fit), so we’ll take advantage of AxKit’s integration with Apache and mod_perl to delegate image handlng to these more suitable tools.
This is done by using a distinctive URL for thumbnail image files and a custom mod_perl handler, My::Thumbnailer to convert full-size images to thumbnails. Neither AxKit nor mod_perl code will be used to serve the images, that will be left to Apache.
Thumbnails will be autogenerated in files with the same name as the main image file with a leading period (".") stuck on the front. In Unix land, this indicates a hidden file, and we don’t want thumbnails (or other dotfiles) showing up in our gallery pages.
My::Thumbnailer uses the relatively new Imager module by Arnar M. Hrafnkelsson and Tony Cook. This is a best-of-breed module that competes with the likes of the venerable GD, the juggernaut Image::Magick, and Graphics::Libplot). Imager is gaining a reputation for speed, quality and a full-featured API.
The .meta file
Before we delve in to the implementation, let’s look at one of the more subtle points of this design. Our previous examples have all been of straight pipelines that successively process a source document into an HTML page. In this application, however, we’ll be funneling data from the source document and a collection of related files we’ll call meta files.
This subtlety is not apparent from the screenshot, but if you look closely you can see that the caption for the first image (“A baby picture”) contains more information than the captions for the other eight. This is because the first image has a meta file that contains a title and a comment to be displayed while the others don’t (though they could).
The first image (“A baby picture”) is from a file named a-look.jpeg, for which there is a meta file named a-look.meta in the same directory that looks like (bold shows the data that ends up getting sent to the browser):
An important feature of this file is that its contents and how they are presented within the caption area are completely unspecified by the core image gallery code. This makes our image gallery highly customizable: the site designer can determine what meta information needs to be associated with each image and how that information gets presented. Data can be presented in the thumbnail caption, in the expanded view, or used for nondisplay purposes.
Here’s what’s in each caption area:
- The title. If a .meta file is found for an image and it has a nonempty
<title>element, then it is used as the name, otherwise the image’s filename is stripped of extensions and used. - The last modified time of the image file (in server-local time, unfortunately).
- A comment (optional): if a .meta file has a
<comment>element, including XHTML markup, it is displayed.
Why a .meta file per image instead of one huge file? It will hopefully allow admins to manage images and meta files together and to allow us to access an image’s meta information in a single file, a natural thing to do in AxKit. By having a pair of files for each image, you can use simple filesystem manipulations to move them around, or use filesystem links to make an image appear in multiple directories, perhaps with the same meta file, perhaps with different ones. This way we don’t need to develop a lot of complex features to get a lot of mileage out of our image gallery (though we could if need be).
The Pipeline
No AxKit implementation documentation would be complete without detailing the pipeline. Here is the pipeline for the image proofsheet page shown above (click on any of the boxes to take you to the discussion about that portion of the pipeline, click on any of the miniature versions of this diagram to come to this one):
|
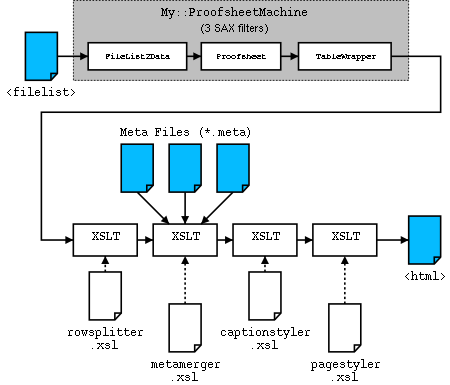
In this case, unlike our previous pipelines, data does not flow in a purely linear fashion: The directory listing from AxKit (<filelist>) feeds the pipeline and is massaged by three SAX filters and then by four XSLT filters. There are so many filters because this application is built to be customizable by tweaking specific filters or by adding other filters to the pipeline. It also uses several SAX filters available on CPAN to make life much easier for us.
In actual use, you may want to add more filters for things like branding, distinguishing groups of images by giving directory heirarchies different backgrounds or titles, adding ad banners, etc.
Here’s a brief description of what each filter does, and why each is an independant filter:
- My::ProofSheetMachine is a short module that builds a SAX Machine Pipeline. SAX filters are used in this application to handle tasks that are more suited to Perl than to XSLT or XSP:
- My::FileList2Data is another short module that uses the XML::Simple module from CPAN to convert the
<filelist>in to a Perl data structure that is passed on. This is its own filter because we want to customize XML::Simple and the resulting data structure a bit before passing it on. - My::ProofSheet is the heart of the gallery page generation. It builds a list of images from the filelist data structure and adds information about the thumbnail images and meta files.
- XML::Filter::TableWrapper is a module from CPAN that is used to wrap a possibly lengthy list of images into rows of no more than five images each.
- My::FileList2Data is another short module that uses the XML::Simple module from CPAN to convert the
- rowsplitter.xsl takes each row of images and makes it into two table rows: one for the images and one for the captions. This is easier to do in XSLT than in SAX, so here is where we shift from SAX processing to XSLT processing.
- metamerger.xsl examines each caption to see if My::ProofSheet put the URL for a meta file in it. If so, it opens the meta file and inserts it in the caption. This is a separate filter because the site admin may prefer to write a custom filter here to integrate meta information from some other source, like a single master file or a centralized database.
- captionstyler.xsl looks at each caption and rewrites it to be XHTML. This is a separate filter for two reasons: it allows the look and feel of the captions to be altered without having to mess with the other filters and, because it is the only filter that cares about the contents of the meta file, the site admin can alter the schema of the meta files and then alter this filter to match.
- pagestyler.xsl converts everything outside of the caption elements in to HTML. It is separate so that the page look and feel can be altered per-site or per-directory without affecting the caption content, etc.
There are several key things to note about this design. The first is that the separation of the process into multiple filters offers the administrator the ability to modify the site’s content and styling. Second, because AxKit is built on Apache’s configuration engine, which filters are used for a particular directory request can be selected based on URL, directory path, query string parameters, browser types, etc. The third point to note is the use of SAX processors to handle tasks that are easier (far easier in some cases) to implement in Perl, while XSLT is used when it is more (programmer and/or processor) efficient.
The Configuration
Here’s how we configure AxKit to do all of this:
    ##
    ## Init the httpd to use our "private install" libraries
    ##
    PerlRequire startup.pl

    ##
    ## AxKit Configuration
    ##
    PerlModule AxKit

    <Directory "/home/me/htdocs">
        Options -All +Indexes +FollowSymLinks

        # Tell mod_dir to translate / to /index.xml or /index.xsp
        DirectoryIndex index.xml index.xsp
        AddHandler axkit .xml .xsp

        AxDebugLevel 10

        AxTraceIntermediate /home/me/axtrace

        AxGzipOutput Off

        AxAddXSPTaglib AxKit::XSP::Util
        AxAddXSPTaglib AxKit::XSP::Param

        AxAddStyleMap text/xsl \
                      Apache::AxKit::Language::LibXSLT

        AxAddStyleMap application/x-saxmachines \
                      Apache::AxKit::Language::SAXMachines

    </Directory>


    <Directory "/home/me/htdocs/04">
        # Enable XML directory listings (see Generating File Lists)
        AxHandleDirs On

        #######################
        # Begin pipeline config
        AxAddRootProcessor application/x-saxmachines . \
            {http://axkit.org/2002/filelist}filelist
        PerlSetVar AxSAXMachineClass "My::ProofSheetMachine"

        # The absolute stylesheet URLs are because
        # I prefer to keep stylesheets out of the
        # htdocs for security reasons.
        AxAddRootProcessor text/xsl file:///home/me/04/rowsplitter.xsl \
            {http://axkit.org/2002/filelist}filelist

        AxAddRootProcessor text/xsl file:///home/me/04/metamerger.xsl \
            {http://axkit.org/2002/filelist}filelist

        AxAddRootProcessor text/xsl file:///home/me/04/captionstyler.xsl \
            {http://axkit.org/2002/filelist}filelist

        AxAddRootProcessor text/xsl file:///home/me/04/pagestyler.xsl \
            {http://axkit.org/2002/filelist}filelist
        # End pipeline config
        #####################

        # This is read by My::ProofSheetMachine
        PerlSetVar MyColumns 5

        # This is read by My::ProofSheet
        PerlSetVar MyMaxX 100

        # Send thumbnail image requests to our
        # thumbnail generator
        <FilesMatch "^\.">
            SetHandler  perl-script
            PerlHandler My::Thumbnailer
            PerlSetVar  MyMaxX 100
            PerlSetVar  MyMaxY 100
        </FilesMatch>

    </Directory>
The first <Directory> section contains the AxKit directives we introduced in article 1 and a new stylesheet mapping for application/x-saxmachines that allows us to use a SAX machine in the pipeline. Otherwise, all of the configuration directives key to this example are in the <Directory "/home/me/htdocs/04"> section.
We saw basic examples of how AxKit works with the Apache configuration engine in article 1 and article 2 in this series. We’ll use this photo gallery application to demonstrate many of the more powerful mechanisms in a future article.
By setting AxHandleDirs On, we tell AxKit to generate the <filelist> document (described in the section Generating File Lists) in the 04 directory and below.
Then it’s off to configure the pipeline for the 04 directory hierarchy. To do this, we take advantage of the fact that AxKit places all elements in the filelist document in to the namespace http://axkit.org/2002/filelist. The AxAddRootProcessor’s third parameter causes AxKit to look at all documents it serves from the 04 directory tree and check to see whether the root element matches the namespace and element name.
This is specified in the notation used by James Clark in his introduction to XML namespaces.
If the document matches, and all AxKit-generated filelists will, then the MIME type and the stylesheet specified in the first two parameters are added to the pipeline. The four AxAddRootProcessor directives add the SAX machine and the four XSLT filters we described in the section “The Pipeline”.
When loading a SAX machine into the pipeline, you can give it a simple list of SAX filters (there are many available on CPAN) and it will build a pipeline of them. This is done with a (not shown) PerlSetVar AxSAXMachineFilters "..." directive. The limitation with this directive is that you cannot pass in any initialization values to the filters and we want to.
So, instead, we use the PerlSetVar AxSAXMachineClass "My::ProofSheetMachine" to tell the Apache::AxKit::Language::SAXMachines module to load the class My::ProofSheetMachine and let that class construct the SAX machine.
The final part of the configuration uses a <Files> section to forward all requests for thumbnail images to the mod_perl handler in My::Thumbnailer.
Walking the Pipeline
Now that we have our filters in place, let’s walk the pipeline and take a look at each filter and what it emits.
Generating File Lists

First, here’s a look at the <filelist> document that feeds the chain. This is created by AxKit when it serves a directory request in much the same way that Apache creates HTML directory listings. AxKit only generates these pages when AxHandleDirs On directive. This causes AxKit to scan the directory for the above screenshot and emit XML like (whitespace added, repetitive stuff elided):
    <?xml version="1.0" encoding="UTF-8"?>
    <!DOCTYPE filelist PUBLIC
      "-//AXKIT/FileList XML V1.0//EN"
      "file:///dev/null"
    >
    <filelist xmlns="http://axkit.org/2002/filelist">
      <directory
        atime="1032276941"
        mtime="1032276939"
        ctime="1032276939"
        readable="1"
        writable="1"
        executable="1"
        size="4096" >.</directory>
      <directory ...>..</directory>
      <directory ...>Mary</directory>
      <directory ...>Jim</directory>
      <file mtime="1031160766" ...>a-look.jpeg</file>
      <file mtime="1031160787" ...>a-lotery.jpeg</file>
      <file mtime="1031160771" ...>a-lucky.jpeg</file>
      <file mtime="1032197214" ...>a-look.meta</file>
      <file mtime="1035239142" ...>foo.html</file>
      ...
    </filelist>
The emboldened bits are the pieces of data we want to display: some filenames and their modification times. Some things to notice:
- All of the elements – most importantly the root element as we’ll see in a bit – are in a special namespace,
http://axkit.org/2002/filelist, using thexmlns=attribute (see James Clark’s introduction for details). - The entries are in unsorted order. We might want to allow the user to sort by different attributes someday, but this means that we at least need to sort the results somehow.
- They contain the complete output from the
stat()system call as attributes, so we can use themtimeattribute to derive a modification time. - There are files in there (
a-look.metaandfoo.html) that we clearly should not be displayed as images. - The filename for
a-look.jpegis not emboldened: We’ll use the<title>element from thea-look.metafile instead.
    <?xml version="1.0" encoding="UTF-8"?>
    <!DOCTYPE filelist PUBLIC
      "-//AXKIT/FileList XML V1.0//EN"
      "file:///dev/null"
    >
    <filelist xmlns="http://axkit.org/2002/filelist">
      <directory
        atime="1032276941"
        mtime="1032276939"
        ctime="1032276939"
        readable="1"
        writable="1"
        executable="1"
        size="4096" >.</directory>
      <directory ...>..</directory>
      <directory ...>Mary</directory>
      <directory ...>Jim</directory>
      <file mtime="1031160766" ...>a-look.jpeg</file>
      <file mtime="1031160787" ...>a-lotery.jpeg</file>
      <file mtime="1031160771" ...>a-lucky.jpeg</file>
      <file mtime="1032197214" ...>a-look.meta</file>
      <file mtime="1035239142" ...>foo.html</file>
      ...
    </filelist>
My::ProofSheetMachine
The processing pipeline is kicked off with a set of three SAX filters built by the My::ProofSheetMachine module:
    package My::ProofSheetMachine;

    use strict;

    use XML::SAX::Machines qw( Pipeline );
    use My::ProofSheet;
    use XML::Filter::TableWrapper;

    sub new {
        my $proto = shift;
        return bless {}, ref $proto || $proto;
    }

    sub get_machine {
        my $self = shift;
        my ( $r ) = @_;

        my $m = Pipeline(
            My::Filelist2Data
            => My::ProofSheet->new( Request => $r ),
            => XML::Filter::TableWrapper->new(
                ListTags => "{}images",
                Columns  => $r->dir_config( "MyColumns" ) || 3,
            ),
        );

        return $m;
    }

    1;
This module provides a minimal constructor, new() so it can be instantiated (this is an Apache::AxKit::Language::SAXMachines requirement, we don’t need that for our sake). AxKit will call the get_machine() method once each request to obtain the SAX machine is used. SAX machines are not reused from request to request.
$r is a reference to the Apache request object (well, actually, to an AxKit subclass of it). This is passed into My::ProofSheet, which uses to interact query some httpd.conf settings, to control AxKit’s cache, and to probe the filesystem through Apache.
$r is also queried in this module to see whether there is a MyColumns setting for this request, with a default in case, it’s not. The ListTags setting tells XML::Filter::TableWrapper to segment the image list produced by the first two filters into rows of images (preparing it to be an HTML table, in other words).
The need to pass parameters like this to the SAX filters is the sole reason we’re using a SAX machine factory class like this. This class is specified by using PerlSetVar AxSAXMachineClass; if we didn’t need to initialize the filters like this, then we could have listed them in a PerlSetVar AxSAXMachineFilters directive. For more details on how SAX machines are integrated with AxKit, see the man page
Currently, only one SAX machine is allowed in an AxKit pipeline at a time (though different pipelines can have different machines in them). This is a limitation of the configuration system more than anything and may well change if need be. However, if we need to add SAX processors to the end of the machine, then the PerlSetVar AxSAXMachineFilters can be used to insert site-specific filters after the main machine (and before the XSLT processors).
My::Filelist2Data
Converting the <filelist> into a proofsheet takes a bit of detailed data munging. This is quite easy in Perl, so the first step in our pipeline is to convert the XML file listing into data. XML::Simple provides this functionality for us, and we overload it so we can grab the resulting data structure and pass it on:
    package My::Filelist2Data;

    use XML::Simple;
    @ISA = qw( XML::Simple );

    use strict;

    sub new {
        my $proto = shift;
        my %opts = @_;

        # The Handler value is passed in by the Pipeline()
        # call in My::ProofSheetMachine.
        my $h = delete $opts{Handler};

        # Even if there's only one file element present,
        # make XML::Simple put it in an ARRAY so that
        # the downstream filter can depend on finding an
        # array of elements and not a single element.
        # This is an XML::Simple option that is almost
        # always set in practice.
        $opts{forcearray} = [qw( file )];

        # Each <file> and <directory> element contains
        # the file name as simple text content.  This
        # option tells XML::Simple to store it in the
        # data member "filename".
        $opts{contentkey} = "filename";

        # This subroutine gets called when XML::Simple
        # has converted the entire document with the
        # $data from the document.
        $opts{DataHandler} = sub {
            shift;
            my ( $data ) = @_;

            # If no files are found, place an array
            # reference in the right spot.  This is to
            # to simplify downstream filter code.
            $data->{file}      ||= [];

            # Pass the data structure to the next filter.
            $h->generate( $data );
        } if $h;

        # Call XML::Simple's constructor.
        return $proto->SUPER::new( %opts );;
    }

    1;
Sending a data structure like this between SAX machines using a non-SAX event is known as “cheating.” But this is Perl, and allowing you to cheat responsibly and judiciously is one of Perl’s great strengths. This works and should work for the foreseeable future. If you’re planning on doing something like this for a general purpose filter, then it behooves you to also provide set_handler and get_handler methods so your filter can be repositioned after instantiation (something XML::SAX::Machines do if need be), but we don’t need to clutter this single-purpose example.
The <filelist> document gets converted to a Perl data structure where each element is a data member in a HASH or an array, like (data elided and rearranged to relate well to the source XML):
    {
      xmlns => 'http://axkit.org/2002/filelist',
      directory => [
        {
          atime      => '1032276941'
          mtime      => '1032276939',
          ctime      => '1032276939',
          readable   => '1',
          writable   => '1',
          executable => '1',
          size       => '4096',
          content    => '.',
        },
        {
          ...
          content    => '..',
        },
        {
          ...
          content    => 'Mary',
        },
        {
          ...
          content    => 'Jim',
        }
      ]
      file => [
        {
          mtime      => '1031160766',
          ...
          content    => 'a-look.jpeg',
        },
        {
          mtime      => '1031160787',
          ...
          content    => 'a-lotery.jpeg',
        },
        {
          mtime      => '1031160771',
          ...
          content    => 'a-lucky.jpeg',
        },
        {
          mtime      => '035239142',
          ...
          content    => 'foo.html',
        },
        ...
      ],
    }
My::ProofSheet
Once the data is in Perl data structure, it’s easy to tweak it (making mtime fields into something readable, for instance) and extend it (adding information about thumbnail images and .meta files, for instance). This is what My::ProofSheet does:
    package My::ProofSheet;

    use XML::SAX::Base;
    @ISA = qw( XML::SAX::Base );

    # We need to access the Apache request object to
    # get the URI of the directory we're presenting,
    # its physical location on disk, and to probe
    # the files in it to see if they are images.
    use Apache;

    # My::Thumbnailer is an Apache/mod_perl module that
    # creates thumbnail images on the fly.  See below.
    use My::Thumbnailer qw( image_size thumb_limits );

    # XML::Generator::PerlData lets us take a Perl data
    # structure and emit it to the next filter serialized
    # as XML.
    use XML::Generator::PerlData;

    use strict;

    sub generate {
        my $self = shift;
        my ( $data ) = @_;

        # Get the AxKit request object so we can
        # ask it for the URI and use it to test
        # whether files are images or not.
        my $r = $self->{Request};

        my $dirname = $r->uri;      # "/04/Baby_Pictures/Other/"
        my $dirpath = $r->filename; # "/home/me/htdocs/...Other/"


        my @images = map $self->file2image( $_, $dirpath ),
            sort {
                $a->{filename} cmp $b->{filename}
            } @{$data->{file}};

        # Use a handy SAX module to generate XML from our Perl
        # data structures.  The XML will look basically like:
        # Write XML that looks like
        #
        # <proofsheet>
        #   <images>
        #     <image>...</image>
        #     <image>...</image>
        #     ...
        #   </images>
        #   <title>/04/BabyePictures/Others</title>
        # </proofsheet>
        #
        XML::Generator::PerlData->new(
            rootname => "proofsheet",
            Handler => $self,
        )->parse( {
            title       => $dirname,
            images      => { image => \@images },
        } );
    }


    sub file2image {
        my $self = shift;
        my ( $file, $dirpath ) = @_;

        # Remove the filename from the fields so it won't
        # show up in the <image> structure.
        my $fn = $file->{filename};

        # Ignore hidden files (first char is a ".").
        # Thumbnail images are cached as hidden files.
        return () if 0 == index $fn, ".";

        # Ignore files Apache knows aren't images
        my $type = $self->{Request}->lookup_file( $fn )->content_type;
        return () unless
            defined $type
            && substr( $type, 0, 6 ) eq "image/";

        # Strip the extension(s) off.
        ( my $name = $fn ) =~ s/\..*//;

        # A meta filename is the image filename with a ".meta"
        # extension instead of whatever extension it has.
        my $meta_fn   = "$name.meta";
        my $meta_path = "$dirpath/$meta_fn";

        # The thumbnail file is stored as a hidden file
        # named after the image file, but with a leading
        # '.' to hide it.
        my $thumb_fn   = ".$fn";
        my $thumb_path = "$dirpath/$thumb_fn";

        my $last_modified = localtime $file->{mtime};

        my $image = {
            %$file,                  # Copy all fields
            type           => $type, # and add a few
            name           => $name,
            thumb_uri      => $thumb_fn,
            path           => "$dirpath/$fn",
            last_modified  => $last_modified,
        };

        if ( -e $meta_path ) {
            # Only add a URI to the meta info, metamerger.xsl will
            # slurp it up if and only if <meta_uri> is present.
            $image->{meta_filename} = $meta_fn;
            $image->{meta_uri}      = "file://$meta_path";
        }

        # If the thumbnail exists, grab its width and height
        # so later stages can populate the <img> tag with them.
        # The eval {} is in case the image doesn't exist or
        # the library can't cope with the image format.
        # Disable caching AxKit's output if a failure occurs.
        eval {
            ( $image->{thumb_width}, $image->{thumb_height} )
                = image_size $thumb_path;
        } or $self->{Request}->no_cache( 1 );

        return $image;
    }


    1;
When My::Filelist2Data calls generate(), generate() sorts and scans the list of files by filename, converts each to an image and sends a page title and the resulting list of images to the next filter (XML::Filter::TableWrapper). Kip Hampton’s XML::Generator::PerlData is a Perl data -> XML serialization module. It’s not meant for generating generic XML; it focuses purely on building an XML representation of a Perl data structure. In this case, that’s ideal, because we will be generating the output document with XSLT templates and we don’t care about the exact order of the elements in each <image> element, each <image> element is just a hash of key/value pairs. We do control the order of the <image> elements, however, by passing an ordered list of them in to XML::Generator::PerlData as an array.
Sorting by filename may not be the preferred thing to do for all applications, because users may prefer to sort by the caption title for the image, but then again they may not, and this allows the site administrator to control sort order by naming the files appropriately. We can add always add sorting later.
Another peculiarity of this code is that it doesn’t guarantee that there will be thumb_width and thumb_height values available. If you just drop the source images in a directory, then the first time the server generates this page, there will be no thumbnails available. In this case, the call to no_cache(1) prevents AxKit from caching the output page so that suboptimal HTML does not get stuck in the cache. This will give the server another chance at generating it with proper tags, hoping of course that by the next time this page is requested, the requisite thumbnails will be available to measure.
This approach gets the HTML to the browser fast, so the user’s browser window will clear quickly and start filling with the top of ths page, so the user will see some activity and be less likely to get impatient. The thumbnails will be generated when the browser sees all the <img> tags. The alternative approach would be to thumbnail the images inline, which would result in a significant delay on large listings before the first HTML hits the browser, or prethumbnailing.
One thing to note about this approach is that many browsers will request images several at a time, which will cause several server processes to be thumbnailing several different images at once. This should result in lower lag on low-load servers because processes can interleave CPU time and disk I/O waits, and can take advantage of multiple processors, if present. On heavily loaded servers, of course, this might be a bad thing; pregenerating thumbnails there would be a good idea.
The output from this filter looks like:
    <?xml version="1.0"?>
    <proofsheet>
      <images>
        <image>
          <path>
            /home/barries/src/mball/AxKit/www/htdocs/04/Baby_Pictures/Others/a-look.jpeg
          </path>
          <writable>1</writable>
          <filename>a-look.jpeg</filename>
          <thumb_uri>.a-look.jpeg</thumb_uri>
          <meta_filename>a-look.meta</meta_filename>
          <name>a-look</name>
          <last_modified>Wed Sep  4 13:32:46 2002</last_modified>
          <ctime>1032552249</ctime>
          <meta_uri>
            file:///home/barries/src/mball/AxKit/www/htdocs/04/Baby_Pictures/Others/a-look.meta
          </meta_uri>
          <mtime>1031160766</mtime>
          <size>8522</size>
          <readable>1</readable>
          <type>image/jpeg</type>
          <atime>1032553327</atime>
        </image>
        <image>
          <path>
            /home/barries/src/mball/AxKit/www/htdocs/04/Baby_Pictures/Others/a-lotery.jpeg
          </path>
          <writable>1</writable>
          <filename>a-lotery.jpeg</filename>
          <thumb_uri>.a-lotery.jpeg</thumb_uri>
          <name>a-lotery</name>
          <last_modified>Wed Sep  4 13:33:07 2002</last_modified>
          <ctime>1032552249</ctime>
          <mtime>1031160787</mtime>
          <size>10113</size>
          <readable>1</readable>
          <type>image/jpeg</type>
          <atime>1032553327</atime>
        </image>
      </images>
      ...
      <title>/04/Baby_Pictures/Others</title>
    </proofsheet>
All the data from the original <file> elements are in each <image> element along with the new fields. Note that the first <image> contains the <meta_uri> (pointing to a-look.meta) while the second doesn’t because there is no a-lotery.meta. As expected both have the <thumb_uri> tags. The parts in bold face are the bits that our presentation happens to want; yours might want more or different bits.
While there is a lot of extra information in this structure, it’s really just the output from one system call (stat()) and some possibly useful byproducts of the My::ProofSheet machinations, so it’s very cheap information that some front end somewhere might want. It’s also easier to leave it all in than to emit just what our example frontend might want and will enable any future upstream filters or extentions to AxKit’s directory scanning to shine through.
No <thumb_width> or <thumb_height> tags are present because I copied this file from the axtrace directory (see the AxTraceIntermediate directive in our httpd.conf file) after viewing a newly added directory. Here’s what the first <image> element looks like when viewing after my browser had requested all thumbnails:
    <?xml version="1.0"?>
    <proofsheet>
      <images>
        <image>
          <thumb_width>72</thumb_width>
          <path>
            /home/barries/src/mball/AxKit/www/htdocs/04/Baby_Pictures/Others/a-look.jpeg
          </path>
          <writable>1</writable>
          <filename>a-look.jpeg</filename>
          <thumb_height>100</thumb_height>
          <thumb_uri>.a-look.jpeg</thumb_uri>
          <meta_filename>a-look.meta</meta_filename>
          <name>a-look</name>
          <last_modified>Wed Sep  4 13:32:46 2002</last_modified>
          <ctime>1032552249</ctime>
          <meta_uri>
            file:///home/barries/src/mball/AxKit/www/htdocs/04/Baby_Pictures/Others/a-look.meta
          </meta_uri>
          <mtime>1031160766</mtime>
          <size>8522</size>
          <readable>1</readable>
          <type>image/jpeg</type>
          <atime>1032784360</atime>
        </image>
        ...
      </images>
      <title>/04/Baby_Pictures/Others</title>
    </proofsheet>
XML::Filter::TableWrapper
XML::Filter::TableWrapper is a CPAN module is used to take the <images> list and segmenting it by insert <tr>...</tr> tags around every (it’s configurable) <image> elements. This configuration is done by the My::ProofSheetMachine module we showed earlier:
    XML::Filter::TableWrapper->new(
        ListTags => "{}images",
        Columns  => $r->dir_config( "MyColumns" ) || 3,
    ),
The output, for our list of 9 images, looks like:
    <?xml version="1.0"?>
    <proofsheet>
      <images>
        <tr>
          <image>
            ...
          </image>
          ... 4 more image elements...
        </tr>
        <tr>
          <image>
            ...
          </image>
          ... 3 more image elements...
        </tr>
      </images>
      <title>/04/Baby_Pictures/Others</title>
    </proofsheet>
Now all the presentation stylesheet (pagestuler.xsl) can key off the <tr> tags to build an HTML <table> or ignore them (and not pass them through) if it wants to display in a list format.
While I’m sure this is possible in XSLT, I have no idea how to do it easily.
rowsplitter.xsl
Experimentation with an early version of this application showed that presenting captions in the same table cell as the thumbnails when the thumbnails are of differing heights caused the captions to be showed at varying heights. This made it hard to scan the captions and added a lot of visual clutter to the page.
One solution is to add an XSLT filter that splits each table row of image data in to two rows, one for the thumbnail and another for the caption:
    <xsl:stylesheet
      version="1.0"
      xmlns:xsl="http://www.w3.org/1999/XSL/Transform"
    >

    <xsl:template match="image" mode="caption">
      <caption>
        <xsl:copy-of select="@*|*|node()" />
      </caption>
    </xsl:template>

    <xsl:template match="images/tr">
      <xsl:copy-of select="." />
      <tr><xsl:apply-templates select="image" mode="caption" /></tr>
    </xsl:template>

    <xsl:template match="@*|node()">
      <xsl:copy>
        <xsl:apply-templates select="@*|node()"/>
      </xsl:copy>
    </xsl:template>

    </xsl:stylesheet>
The second template in this stylesheet matches each row (<tr> element) in the <images> element and copies it verbatim and then emits a second <tr> element right after it with a list of <caption> elements with copies of the content of each of the <image> tags in the original row. The first template is applied only to the <image> tags when creating this second row due to the mode="caption" attributes.
The third template is a standard piece of XSLT boilerplate that passes through all the XML that is not matched by the first two templates. This XML would otherwise be mangled (stripped of elements, to be specific) by the wacky default XSLT rules.
Now, I know several ways to do this in Perl in the AxKit environment and none are so easy for me as using XSLT. YMMV.
The output from that stage looks like:
    <?xml version="1.0"?>
    <proofsheet>
      <images>

        <tr><image>...  </image>   ...total of 5... </tr>
        <tr><caption>...</caption> ...total of 5... </tr>

        <tr><image>...  </image>   ...total of 4... </tr>
        <tr><caption>...</caption> ...total of 4... </tr>

      </images>
      <title>/04/Baby_Pictures/Others</title>
    </proofsheet>
The content of each <image> tag and each <caption> tag is identical. It’s easier to do the transform this way and allows the frontend stylesheets the flexibility of doing things like putting the image filename or modification time in the same cell as the thumbnail.
metamerger.xsl
As with the row splitter, expressing the metamerger in XSLT is an expedient way of merging in external XML documents, for several reasons. The first is for efficiency’s sake: We’re already using XSLT before and after this filter, and AxKit optimizes XSLT->XSLT handoffs to avoid reparsing. Another is that the underlying implementation of AxKit’s XSLT engine is the speedy C of libxslt. A third is that we’re not altering the incoming file at all in this stage, so the XSLT does not get out of hand (I do not consider XSLT to be a very readable programming language; its XML syntax makes for very opaque source code).
Another approach would be to go back and tweak My::ProofSheet to inherit from XML::Filter::Merger and insert it using a SAX parser. That would be a bit slower, I suspect, because SAX parsing in general tends to be slower than XSLT’s internal parsing. It would rob the application of the configurability that having merging as a separate step engenders. By factoring this functionality in to the metamerger.xsl stylesheet, we offer the site designer the ability to pull data from other sources, or even to fly without any metadata at all.
Here’s what metamerger.xsl looks like:
    <xsl:stylesheet
      version="1.0"
      xmlns:xsl="http://www.w3.org/1999/XSL/Transform"
    >

    <xsl:template match="caption">
      <caption>
        <xsl:copy-of select="*|@*|node()" />
        <xsl:copy-of select="document( meta_uri )" />
      </caption>
    </xsl:template>

    <xsl:template match="*|@*">
      <xsl:copy>
        <xsl:apply-templates select="*|@*|node()" />
      </xsl:copy>
    </xsl:template>

    </xsl:stylesheet>
The first template does all the work of matching each <caption> element and copying its content, then parsing and inserting the document indicated by the <meta_uri> element, if present. The document() function turns into a noop if <meta_uri> is not present. The second template is that same piece of boilerplate we saw in rowsplitter.xsl to copy through everything we don’t explicitly match.
And here’s what the <caption> for a-look.jpeg now looks like (all the other <caption> elements were left untouched because there are no other .meta files in this directory):
    <caption>
      <thumb_width>72</thumb_width>
      <path>/home/barries/src/mball/AxKit/www/htdocs/04/Baby_Pictures/Others/a-look.jpeg</path>
      <writable>1</writable>
      <filename>a-look.jpeg</filename>
      <thumb_height>100</thumb_height>
      <thumb_uri>.a-look.jpeg</thumb_uri>
      <meta_filename>a-look.meta</meta_filename>
      <name>a-look</name>
      <last_modified>Wed Sep  4 13:32:46 2002</last_modified>
      <ctime>1032552249</ctime>
      <meta_uri>file:///home/barries/src/mball/AxKit/www/htdocs/04/Baby_Pictures/Others/a-look.meta</meta_uri>
      <mtime>1031160766</mtime>
      <size>8522</size>
      <readable>1</readable>
      <type>image/jpeg</type>
      <atime>1032784360</atime>
      <meta>
        <title>A baby picture</title>
        <comment><b>ME!</b>.  Well, not really.  Actually, it's some random image from the 'net.
</comment>
      </meta>
    </caption>
As mentioned before, this stylesheet does not care what you put in the meta file, it just inserts anything in that file from the root element on down. So you are free to put any meta information your application requires in the meta file and adjust the presentation filters to style it as you will.
The .meta information is not inserted in to the <image> tags because we know that none of our presentation will not need any of it there.
captionstyler.xsl
The last two stages of our pipeline turn the data assembled so far into HTML. This is done in two stages in order to separate general layout and presentation from the presentation of the caption because the these portions of the presentation might need to vary independently between one collection of images and another.
The caption stylesheet for this example is:
    <xsl:stylesheet
      version="1.0"
      xmlns:xsl="http://www.w3.org/1999/XSL/Transform"
    >

    <xsl:template match="caption">
      <caption width="100" align="left" valign="top">

        <a href="{filename}">
          <xsl:choose>
            <xsl:when test="meta/title and string-length( meta/title )">
              <xsl:copy-of select="meta/title/node()" />
            </xsl:when>
            <xsl:otherwise>
              <xsl:value-of select="name" />
            </xsl:otherwise>
          </xsl:choose>
        </a><br />

        <font size="-1" color="#808080">
          <xsl:copy-of select="last_modified/node()" />
          <br />
        </font>

        <xsl:copy-of select="meta/comment/node()" />

      </caption>
    </xsl:template>

    <xsl:template match="*|@*|node()">
      <xsl:copy>
        <xsl:apply-templates />
      </xsl:copy>
    </xsl:template>

    </xsl:stylesheet>
The first template replaces all <caption> elements with new <caption> cells with a default width and alignment, and then fills these with the name of the image, which is also a link to the underling image file, and the <last_modified time string formatted by My::ProofSheet and any <comment> that might be present in the meta file.
The <xsl:choose> element is what selects the title to display for the image. The first <xsl:when>looks to see if there is a <title> element in the meta file and uses it if present. The <xsl:otherwise> defaults the name to the <name> set by My::ProofSheet.
The captions output by this stage look like:
    <caption width="100" align="left" valign="top">
      <a href="a-look.jpeg">A baby picture</a>
      <br/>
      <font size="-1" color="#808080">Wed Sep
        4 13:32:46 2002<br/>
      </font>
      <b>ME!</b>.  Well, not really.  Actually, it's
        some random image from the 'net.
    </caption>
    <caption width="100" align="left" valign="top">
      <a href="a-lotery.jpeg">a-lotery</a>
      <br/>
      <font size="-1" color="#808080">Wed Sep
        4 13:33:07 2002<br/></font>
    </caption>
The former is what comes out when a .meta file is found, the latter when it is not.
pagestyler.xsl
And now, the final stage. If you’ve made it this far, congratulations; this is the start of a real application and not just a toy, so it’s taken quite some time to get here.
The final stage of the processing pipeline generates an HTML page from the raw data, except for the attributes and content of <caption> tags, which it passes through as-is:
    <xsl:stylesheet
      version="1.0"
      xmlns:xsl="http://www.w3.org/1999/XSL/Transform"
    >

    <xsl:template match="/*">
      <html>
        <head>
          <title>Images in <xsl:value-of select="title" /></title>
        </head>
        <body bgcolor="#ffffff">
          <xsl:apply-templates select="images" />
        </body>
      </html>
    </xsl:template>


    <xsl:template match="images">
      <table>
        <xsl:apply-templates />
      </table>
    </xsl:template>

    <xsl:template match="tr">
      <xsl:copy>
        <xsl:apply-templates select="*" />
      </xsl:copy>
    </xsl:template>

    <xsl:template match="image">
      <td align="left" valign="top">
        <a href="{filename}">
          <img border="0" src="{thumb_uri}">
            <xsl:if test="thumb_width">
              <xsl:attribute name="width">
                <xsl:value-of select="thumb_width" />
              </xsl:attribute>
            </xsl:if>
            <xsl:if test="thumb_height">
              <xsl:attribute name="height">
                <xsl:value-of select="thumb_height" />
              </xsl:attribute>
            </xsl:if>
          </img>
        </a>
      </td>
    </xsl:template>

    <xsl:template match="@*|node()" mode="caption">
      <xsl:copy>
        <xsl:apply-templates select="@*|node()" mode="caption" />
      </xsl:copy>
    </xsl:template>

    <xsl:template match="caption">
      <td>
        <xsl:apply-templates select="@*|node()" mode="caption" />
      </td>
    </xsl:template>

    </xsl:stylesheet>
The first template generates the skeleton of the HTML page, the second one grabs the <images> list from the source document, emits a <table>, the third copies the <tr> tags, the fourth replaces all <image> tags with <td> tags containing the thumbnail image as a link to the underlying image (similar to what captionstyler.xsl did with the picture name). The only subtlety here is that the optional <thumb_width> and <thumb_height> elements are used, if present, to inform the browser of the size of the thumbnail in order to speed up the layout process (as mentioned before, pages that don’t contain this information are not cached so that when the thumbnails are generated, new HTML will be generated with it).
The fourth template converts the <caption> elements to <td> elements and copies all their content through, since captionstyler.xsl already did the presentation for them.
Tweaking this stylesheet or replacing it controls the entire page layout other than thumbnail sizing (which is set by the optional MyMaxX and MyMaxY PerlSetVar settings in httpd.conf). A different stylesheet in this point in the chain could choose to ignore the <tr> tags and present a list style output. A later stylesheet could be added to add branding or advertising to the site, etc., etc.
My::ThumbNailer
Here’s the apache module that generates thumbnails. The key thing to remember is that, unlike all the other code and XML shown in this article, this is called once per thumbnail image, not once per directory. When a browser requests a directory listing, it gets HTML from the pipeline above with lots of URIs for thumbnail images. It will then usually request each of those in turn. The httpd.conf file directs all requests for dotfiles to this module:
    package My::Thumbnailer;

    # Allow other modules like My::ProofSheet to use some
    # of our utility routines.
    use Exporter;
    @ISA = qw( Exporter );
    @EXPORT_OK = qw( image_size thumb_limits );

    use strict;

    use Apache::Constants qw( DECLINED );
    use Apache::Request;
    use File::Copy;
    use Imager;


    sub image_size {
        my $img = shift;

        if ( ! ref $img ) {
            my $fn = $img;
            $img = Imager->new;
            $img->open( file => $fn )
                or die $img->errstr(), ": $fn";
        }

        ( $img->getwidth, $img->getheight );
    }


    sub thumb_limits {
        my $r = shift;

        # See if the site admin has placed MyMaxX and/or
        # MyMaxY in the httpd.conf.
        my ( $max_w, $max_h ) = map
            $r->dir_config( $_ ),
            qw( MyMaxX MyMaxY );

        return ( $max_w, $max_h )
            if $max_w || $max_h;

        # Default to scaling down to fit in a 100 x 100
        # pixel area (aspect ration will be maintained).
        return ( 100, 100 );
    }


    # Apache/mod_perl is configured to call
    # this handler for every dotfile
    # requested.  All thumbnail images are dotfiles,
    # some dotfiles may not be thumbnails.
    sub handler {
        my $r = Apache::Request->new( shift );

        # We only want to handle images.
        # Let Apache handle non-images.
        goto EXIT
            unless substr( $r->content_type, 0, 6 ) eq "image/";

        # The actual image filename is the thumbnail
        # filename without the leading ".".  There's
        ( my $orig_fn = $r->filename ) =~ s{/\.([^/]+)\z}{/$1}
            or die "Can't parse ", $r->filename;

        # Let Apache serve the thumbnail if it already
        # exists and is newer than the original file.
        {
            my $thumb_age = -M $r->finfo;
            my $orig_age  = -M $orig_fn;
            goto EXIT
                if $thumb_age && $thumb_age <= $orig_age;
        }

        # Read in the original file
        my $orig = Imager->new;
        unless ( $orig->open( file => $orig_fn ) ) {
            # Imager can't hack the format, fall back
            # to the original image.  This can happen
            # if you forget to install libgif
            # (as I have done).
            goto FALLBACK
                if $orig->errstr =~ /format not supported/;

            # Other errors are probably more serious.
            die $orig->errstr, ": $orig_fn\n";
        }

        my ( $w, $h ) = image_size( $orig );

        die "!\$w for ", $r->filename, "\n" unless $w;
        die "!\$h for ", $r->filename, "\n" unless $h;

        my ( $max_w, $max_h ) = thumb_limits( $r );

        # Scale down only,  If the image is smaller than
        # the thumbnail limits, let Apache serve it as-is.
        # thumb_limits() guarantees that either $max_w
        # or $max_h will be true.
        goto FALLBACK
            if ( ! $max_w || $w < $max_w )
            && ( ! $max_h || $h < $max_h );

        # Scale down to the maximum dimension to the
        # requested size.  This can mess up for images
        # that are meant to be scaled on each axis
        # independantly, like graphic bars for HTML
        # page seperators, but that's a very small
        # demographic.
        my $thumb = $orig->scale(
            $w > $h
                ? ( xpixels => $max_w )
                : ( ypixels => $max_h )
        );
        $thumb->write( file => $r->filename,)
            or die $thumb->errstr, ": ", $r->filename;

        goto BONK;

    FALLBACK:
        # If we can't or don't want to build the thumbnail,
        # just copy the original and let Apache figure it out.
        warn "Falling back to ", $orig_fn, "\n";
        copy( $orig_fn, $r->filename );

    BONK:
        # Bump apache on the head just hard enough to make it
        # forget the thumbnail file's old stat() and
        # mime type since we've most likely changed all
        # that now.  This is important for the headers
        # that control downstream caching, for instance,
        # or in case Imager changed mime types on us
        # (unlikely, but hey...)
        $r->filename( $r->filename );

    EXIT:
        # We never serve the image data, Apache is perfectly
        # good at doing this without our help.  Returning
        # DECLINED causes Apache to use the next handler in
        # its list of handlers.  Normally this is the default
        # Apache file handler.
        return DECLINED;
    }

    1;
There should be enough inline commentary to explain that lot. The only thing I’ll say is that, to head off the gotophobes, I think the use of goto makes this routine a lot clearer than the alternatives; the early versions did not use it and were less readable/maintainable. This is because the three normal exit routes happen to stack nicely up from the bottom so the fallthrough from one labeled chunk to the next happens nicely.
The most glaring mistake here is that there is no file locking. We’ll add that in next time.
Summary
The final result of the code in this article is to build the image proofsheet section of the page we showed at the beginning of the article. The next article will complete that page, and then we’ll build the image presentation page and a metadata editor in future articles.
Help and thanks
In case of trouble, have a look at some of the helpful resources we listed in the first article.
Tags
Feedback
Something wrong with this article? Help us out by opening an issue or pull request on GitHub

Site Map
License
This work is licensed under a Creative Commons Attribution-NonCommercial 3.0 Unported License.

Legal
Perl.com and the authors make no representations with respect to the accuracy or completeness of the contents of all work on this website and specifically disclaim all warranties, including without limitation warranties of fitness for a particular purpose. The information published on this website may not be suitable for every situation. All work on this website is provided with the understanding that Perl.com and the authors are not engaged in rendering professional services. Neither Perl.com nor the authors shall be liable for damages arising herefrom.