

Building Testing Libraries
Testing is an important step in developing any important body of work. In today’s pragmatic culture, we’re taught to test first, test often, and design with tests. The expectation is that chanting “test test test” forgives all sins. To a large extent, this is true. Testing helps us produce quality software at all scales.
The extreme code produced by this extreme lifestyle hides in the test suite itself. Often the ugliest code we write resides in files with a .t extension. Riddled with redundant, ghastly expressions, the test suite is the collateral damage on our road to beautiful production code.
Let’s review some common pitfalls made when testing. Many of these testing procedures may be new to you. Serious headway has been made in recent history with the testing libraries on the CPAN.
A Test File is Just a Program
Each test file is a program, just as important as any other program you’d write that uses software being tested. It must be treated with the same care. If you plan to use strict and warnings in a program related to the code you’re testing, be sure to do the same in your tests.
Each test file should start with these three lines.
  #!/path/to/perl
  use strict;
  use warnings;
If you plan to run your software in a taint-checked environment, which is considered a good idea, then supply the -T command-line option to the #! line.
#!/path/to/perl -T
This will ensure that you won’t make syntactic mistakes in your test files. It will also require your software to work correctly in a restricted environment.
Be Compatible with Test::Harness
Test::Harness is a very useful Perl module for running test suites. If you are building a Perl module yourself, and using ExtUtils::MakeMaker or Module::Build for the build process, you’re using Test::Harness. If you aren’t using any of these mechanisms, do try to be compatible with it. This will help other users and developers of your software who are used to dealing with Test::Harness.
Compatibility comes in the form of the test file’s output. Test::Harness will run your program and record its output to STDOUT. Anything sent to STDERR is ignored, silently passed on to the user. There are particulars about testing under the harness that should be observed. The basics are simple.
When a test passes, it outputs a line containing ok $N, where $N is the test number. When a test fails, the line contains not ok $N. Test numbers are optional but recommended. Tests may be named. Anything after the number, $N, is considered the test name, up to a hash (#). Anything following the hash is a comment.
Furthermore, you are encouraged to supply a header. The header tells Test::Harness how many tests you expect to run and should be the first thing you output. If you’re unsure of the number of tests, the header may be the very last thing output. Its format is also simple: 1..$M, where $M is the total number of tests to run. The header helps the harness figure out how well your tests did.
Any other output should be commented on lines beginning with a hash (#). Here is an example of prototypical output understood by Test::Harness.
  1..4
  ok 1 - use Software::Module
  ok 2 - object isa Software::Module
  not ok 3 - $object->true() should return true
  #     Failed test (test.t)
  #          got: undef
  #     expected: 1
  ok 4 # skip Net::DNS required for this test
  # Looks like you failed 1 tests of 4.
Use a Testing Module
A simple way to achieve Test::Harness compatibility is to use a testing module from the CPAN. Many test suites over the years have reinvented the ok() function, for example.
  {
    my $N = 1;
    sub ok($;$) {
        my ($test, $name) = @_;
        print "not " unless $test;
        print "ok $N - $name\n";
        $N++;
    }
  }
There is no need to do this, however. The standard Perl distribution comes with testing modules. Two great options are Test::Simple and Test::More. Test::Simple is a great way to get your feet wet; it implements only the ok() function. Test::More has more features and is recommended when you write your test suites.
Using Test::More is very simple; many have written on the subject. This is how you would achieve the output described in the previous section.
  #!/usr/bin/perl -T
  use strict;
  use warnings;
  use Test::More tests => 4;

  use_ok 'Software::Module';
  my $object = Software::Module->new;
  isa_ok $object, 'Software::Module', 'object';
  cmp_ok $object->true, 1, '$object->true() should return true';

  SKIP: {
      skip 1, "Net::DNS required for this test"
        unless eval 'require Net::DNS';

      ok $object->network(), "run over network";
  }
Don’t Iterate, Compare
I’ve often seen tests that loop over a list and check each item to be sure the list is correct. While this approach makes you feel good, artificially adding to the number of tests you’ve written, it can be sloppy and long-winded. Here is an example.
  my @fruits = qw[apples oranges grapes];
  my @result = get_fruits();
  foreach my $n ( 0 .. $#fruits ) {
      is $result[$n], $fruits[$n], "$fruits[$n] in slot $n";
  }
  is scalar(@result), scalar(@fruits), "fruits the same size";
It looks like four tests were written; the reality is that one test was written poorly. Test::More has several utility functions to get the job done. In this test, @fruits represents a set of non-repeatable fruits I expect to get back from get_fruits(). As such, I can use eq_set() to test this function in one quick try.
  my @fruits = qw[apples oranges grapes];
  my @result = get_fruits();
  ok eq_set(\@result, \@fruits), "got [@fruits]";
That was easy and short. But what happens when you have a deep data structure that you’re dying to test? That’s where Test::Deep comes in. Downloadable from the CPAN, this module provides the cmp_deeply() function. Here is a simple example.
  use Test::Deep;
  my $people = [
    {
      name     => "Casey West",
      employer => "pair Networks",
    },
    {
      name     => "Larry Wall",
      employer => "The Perl Foundation",
    },
  ];

  my $result = $dude->contacts->retrieve_all;

  cmp_deeply $result, $people, 'contacts match';
This example scratched the surface of what Test::Deep is capable of. When you’ve got to test a complex data structure, especially in a complex way, use this module. Here is a more difficult example made testable by this module. In this example, $dude->contacts->retrieve_all returns an unordered list of contacts with various bits of information associated with each of them.
  use Test::Deep;
  my $person = {
    name     => re("^[\w\s]+$"),
    employer => ignore(),
    age      => code(sub { shift > 18 }),
  };
  my $people = array_each($person);
  my $result = $dude->contacts->retrieve_all;

  cmp_deeply $result, $people, 'contacts match';
This code, using only functions exported by Test::Deep, does a lot of work. Each person has a definition that should match $person. Every person in the $result list is a hash reference containing three elements. name must match the regular expression /^[\w\s]+$/, employer must exist and its value is ignored, and age should be over 18 or it will fail. array_each() returns an object that instructs cmp_deeply that every value in a list must match the definition provided.
This small amount of code accomplishes quite a lot. Test::Deep has saved us from wasting time and working hard to solve a difficult problem. It has made the hard things possible.
Don’t Let POD go Unchecked
Documentation is just as important as code, or tests. There are several ways to care for POD in your test suite. First, it’s important to keep it well-formed. For this, we turn to Test::Pod. This Perl module takes all the work out of testing POD with a useful function all_pod_files_ok(). Simply create a new test program with the following contents.
  use Test::More;
  plan skip_all => "Test::Pod 1.00 required for testing POD"
    unless eval "use Test::Pod 1.00";
  all_pod_files_ok();
Yes, it really is that simple. When you run this program, it will test all the POD it finds in your blib directory.
Another simple test we can run on the documentation is coverage analysis. What good is documentation if it doesn’t document completely? Test::Pod::Coverage is the right module for the job, yet another gem that hides all the hard work from us with a simple function, all_pod_coverage_ok(). Again, we’ll create a new test program.
  use Test::More;
  plan skip_all => "Test::Pod::Coverage 1.08 required for testing POD coverage"
    unless eval "use Test::Pod::Coverage 1.08";
  all_pod_coverage_ok();
Coverage is only half of the battle. Remember, Test::Pod::Coverage can’t tell you if your documentation is actually correct and thorough.
In both of these examples, we use the plan function exported from Test::More to allow us to “bail out” of our tests if the appropriate Perl module isn’t installed. This makes our POD tests optional. If you don’t want them to be optional, remove that line and be sure to list them as prerequisites for building and installing your software.
Know What You’re Testing
One of the biggest testing mistakes is to assume that you know what you’re testing. Tests are designed to exercise your software. Let your test exercise the good and bad portions of your software. Make it succeed and, most importantly, make it fail. Superior test coverage digs deep into every line of code you’ve written. How do you know if your tests are amazing? Coverage analysis.
Code coverage isn’t something you can guess; you need good tools. Perl has a good tool: Devel::Cover. This module creates a database that maps actual execution to your source code. It analyzes statements, branches, conditions, subroutines, and even POD and execution time. It then provides a total for all of these areas, as well as a total for each Perl module. It’s very simple to use, adding just a little to your make test process.
  > cover -delete
  > HARNESS_PERL_SWITCHES=-MDevel::Cover make test
The first command deletes any existing coverage database. On the second line we set an environment variable for Test::Harness, HARNESS_PERL_SWITCHES to a Perl command-line switch that imports Devel::Caller. This is all that’s required of you. Each of your test programs will now run with Devel::Caller loaded and analyzing execution in the background.
To see your coverage database on the command line, issue one command.
  > cover
  ---------------------------- ------ ------ ------ ------ ------ ------ ------
  File                           stmt branch   cond    sub    pod   time  total
  ---------------------------- ------ ------ ------ ------ ------ ------ ------
  blib/lib/List/Group.pm         94.7   66.7   33.3  100.0  100.0  100.0   81.6
  Total                          94.7   66.7   33.3  100.0  100.0  100.0   81.6
  ---------------------------- ------ ------ ------ ------ ------ ------ ------

  Writing HTML output to ~/cvs/perl/modules/List-Group/cover_db/coverage.html ...
  done.
As you can see, I could’ve done better. But what did I fail to test? Notice that cover wrote some HTML output. That is the diamond in the rough; the HTML output details everything. Each module has its own series of web pages detailing each of the coverage groups. I did particularly poorly on the conditional coverage – let’s see how.
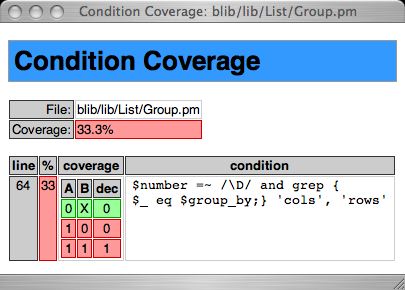 Now it's become clear. My tests never allow either of the two statements in this condition to succeed. All of my tests make the first statement fail; the second is never executed. I need to update my tests with at least two more for `100.0` conditional coverage. The first test will supply a non-number for the `$number` variable. The second will supply a value for the `$group_by` variable that doesn't exist in the list for which `grep` is looking.
Testing for coverage is a noble goal. I find this method very useful when writing tests for existing software. There are many situations you may think you’re testing well. Don’t guess; know. Coverage analysis is equally useful for new development. If you’ve adopted the “test first” method and your coverage isn’t 100 percent, something is wrong. Either your tests need help, or you’ve written more code than originally required.
Keep Test Files Organized
Perl software distributions follow several widely adopted guidelines concerning tests. The rules are simple: test files should reside in a t/ directory, and each test file ends in a .t extension. Test::Harness understands these rules and make test will run every file that abides by them.
The filename can be anything you like. It’s a good idea to use descriptive filenames instead of just digits or numerical words. Good examples are pod-coverage.t, software-class-api.t, and compile.t. Sometimes it’s desirable to determine the order in which your test files will be run. In these cases, prefix the filename with a number. If you want compilation tests to run first and POD tests last, name them accordingly as 00-compile.t and 99-pod-coverage.t.
Looking Ahead
Testing can be a tedious, difficult job. By this point, you have a number of helpful tools to make the task easier. There are many more testing modules on the CPAN that could have been covered here; I encourage you to explore them all.
Tags
Feedback
Something wrong with this article? Help us out by opening an issue or pull request on GitHub
Site Map
License
This work is licensed under a Creative Commons Attribution-NonCommercial 3.0 Unported License.

Legal
Perl.com and the authors make no representations with respect to the accuracy or completeness of the contents of all work on this website and specifically disclaim all warranties, including without limitation warranties of fitness for a particular purpose. The information published on this website may not be suitable for every situation. All work on this website is provided with the understanding that Perl.com and the authors are not engaged in rendering professional services. Neither Perl.com nor the authors shall be liable for damages arising herefrom.